

USB debugging is an Android developer setting that allows a phone to communicate with developer tools on a computer. Developers, technicians, testers and device-processing teams use it when they need deeper access to an Android device for diagnostics, testing, app development or workflow automation.
For everyday users, USB debugging can sound confusing because it sits inside Android’s hidden Developer options menu. It is not the same as charging a phone, transferring photos or using a normal USB cable connection. Instead, it gives trusted tools a deeper route to communicate with the device.
This guide explains what USB debugging is, what it does, when it is used, why it should be managed carefully, and how MobiCode supports professional Android testing and device-processing workflows.
What is USB debugging?
USB debugging is a setting on Android devices that allows the phone to communicate with development and debugging tools through a USB connection. Google’s Android developer documentation explains that the setting lets an Android device communicate with a development machine through Android Debug Bridge, usually called ADB.
ADB is a command-line tool used by developers and technicians to communicate with Android devices. It can support tasks such as installing apps for testing, reading device logs, debugging software and running device commands.
What does this Android setting do?
The setting opens a communication channel between an Android device and a trusted computer. Once a user enables it and authorises the computer, developer tools can interact with the phone in ways that normal USB transfer does not allow.
Depending on the tools and permissions involved, this may help with:
- testing Android apps on a real device
- installing development builds
- viewing system and app logs
- running ADB commands
- debugging app behaviour
- supporting diagnostic workflows
- automating some device-processing steps
For developers, this is useful because real-device testing often reveals issues that do not appear in an emulator. For device-processing teams, it can support structured testing and diagnostics when used inside a controlled workflow.
Is it the same as file transfer?
No. This developer setting is different from normal file transfer.
A standard USB connection may let a user charge the phone, transfer photos or move files between the device and a computer. Developer access goes further because it allows technical tools to communicate with the Android system.
That is why Android places the option inside Developer options rather than the normal USB connection menu. It is a specialist setting, not a general consumer feature.
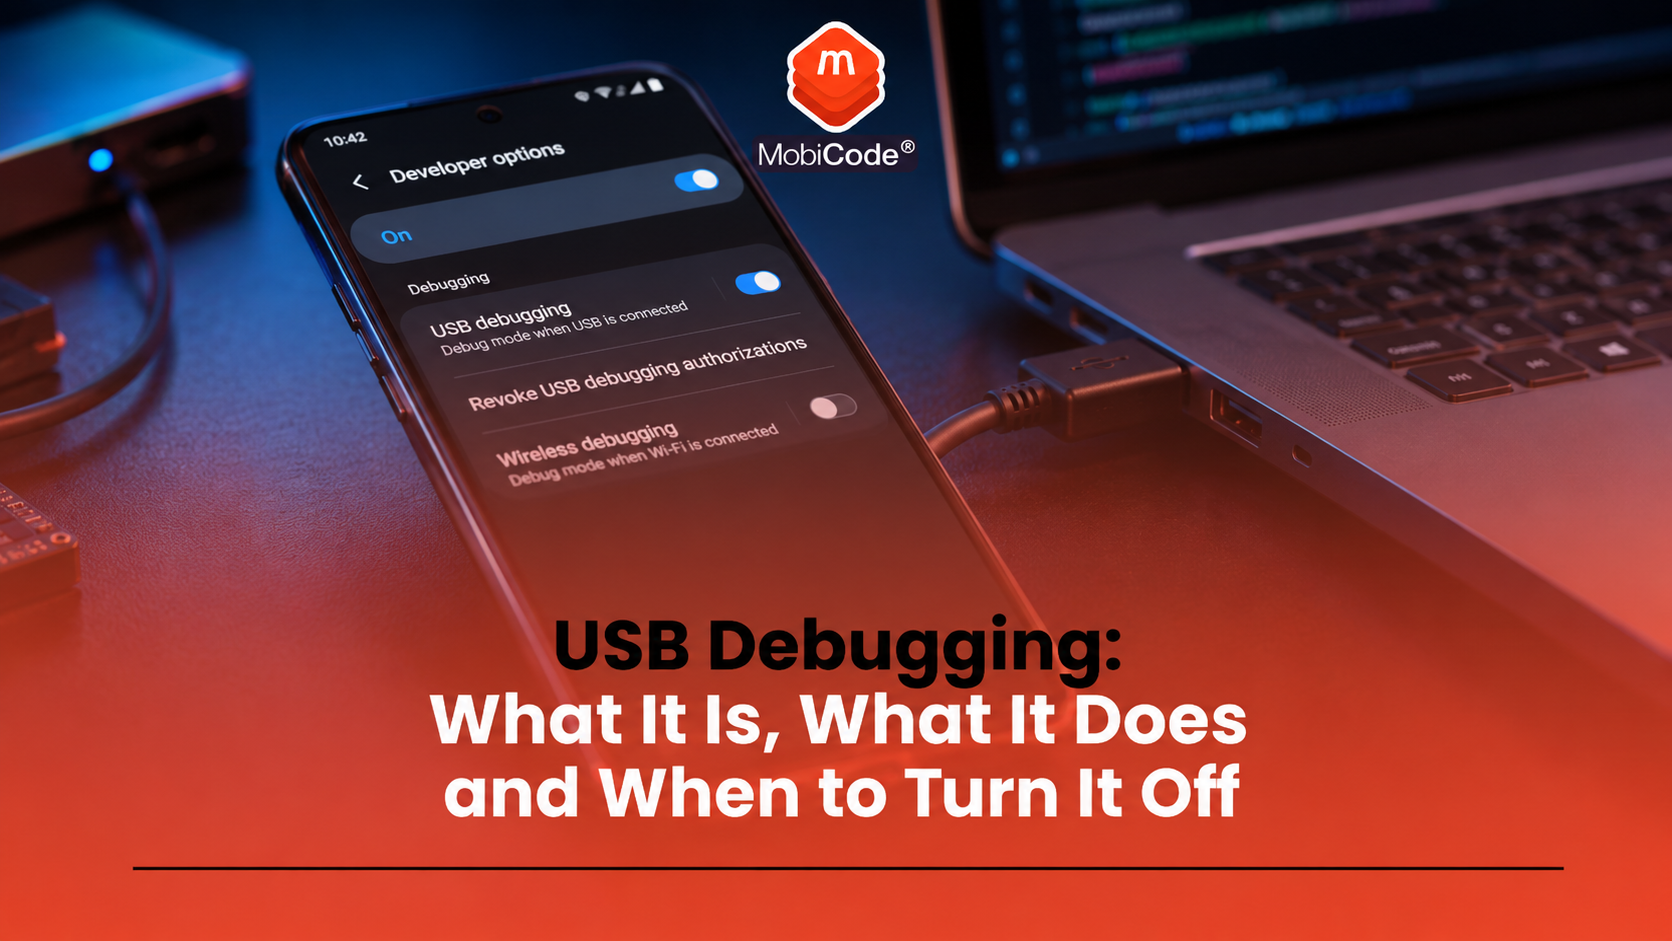
Where to find it on Android
USB debugging is normally found inside Developer options. On many Android devices, Developer options are hidden by default. Google’s Android developer documentation explains that, on Android 4.2 and higher, users must enable Developer options before they can access settings such as this one.
A common route is:
- Open Settings
- Tap About phone
- Tap Build number several times until Developer options are enabled
- Go back to Settings
- Open System or search for Developer options
- Find USB debugging
The exact menu wording varies by Android version and manufacturer. Some devices place Developer options under System, while others show it in a different part of Settings.
How to turn it on safely
Only turn on USB debugging when you have a clear reason to use it and you trust the computer you are connecting to.
A typical process looks like this:
- Enable Developer options
- Open Developer options
- Turn on USB debugging
- Connect the phone to a trusted computer with a USB cable
- Review the authorisation prompt on the phone
- Allow the computer only if you trust it
When an Android phone connects to a new computer for debugging, the phone may show an authorisation prompt. Users should read this prompt carefully rather than tapping allow automatically.
Should you turn it off afterwards?
For most everyday users, yes. USB debugging should usually stay off unless it is needed for a specific task.
Developers, technicians and professional device processors may need the setting as part of their work. However, a normal user does not need to leave it enabled all the time.
A sensible approach is:
- turn the setting on only when needed
- connect only to trusted computers
- remove authorisations you no longer need
- turn the setting off after the task is complete
This reduces unnecessary exposure and keeps the device closer to its normal consumer configuration.
Is this setting dangerous?
USB debugging is not automatically dangerous, but it can create risk if misused. The setting exists for legitimate development and diagnostic work. The concern is that it gives deeper access than a normal USB connection.
A trusted developer machine may use this feature safely. An unknown or untrusted computer should not receive debugging authorisation.
Risk can increase if:
- the setting stays on unnecessarily
- the user approves an unknown computer
- the device connects to a public or untrusted machine
- the phone has weak lock-screen security
- staff use developer access outside a controlled workflow
For businesses, this is why process matters. Developer access should sit inside a controlled testing or processing workflow, not become an informal shortcut.
What is Android Debug Bridge?
Android Debug Bridge, usually shortened to ADB, is the tool that often sits behind USB debugging. Google describes ADB as a versatile command-line tool that lets users communicate with a device.
ADB uses a client-server model and can connect to a device over USB. To use ADB with a device connected by USB, Google says users must enable the Android debugging option in Developer options.
For developers, ADB is a standard tool. For device-processing teams, it can support testing and workflow automation when trained staff handle it with appropriate software.
Why developers use this feature
Developers use USB debugging because it lets them test apps and inspect behaviour on real Android devices. A phone in normal consumer mode does not provide the same level of feedback.
This feature can help developers:
- install test versions of apps
- check how an app behaves on real hardware
- view logs while the app is running
- debug crashes or unusual behaviour
- test across different Android versions and devices
That is why the feature appears in Android’s developer documentation and Android Studio guidance. It is a normal part of professional Android development.
Why it matters in device testing
Used-device businesses may handle large numbers of Android phones. These devices need consistent checks before resale, recycling or refurbishment. Developer access may form part of technical workflows that support diagnostics, testing or automation.
However, it should not replace a full device process. A business still needs to check the device identity, IMEI, condition, account lock status, data handling and final grade.
A proper device workflow should consider:
- IMEI and serial capture
- device model and storage confirmation
- functional testing
- screen, battery, camera, audio and port checks
- account lock or activation lock status
- secure data erasure
- final grading and resale route
The setting can support parts of the technical process, but it does not answer every resale question by itself.
How it relates to data erasure
USB debugging should not be confused with secure data erasure. Enabling the feature does not prove that a phone has been wiped, and turning it off does not prove that data has been removed.
For businesses, data erasure needs its own controlled process. Teams should be able to show what happened to the device, when it happened and what result was recorded.
MobiWIPE supports professional data-erasure workflows before devices move to resale or reuse. In a high-volume environment, this matters because staff need evidence, not assumptions.
How it supports phone diagnostics
Diagnostics help businesses understand whether a used Android phone works properly before resale. USB debugging may support some diagnostic processes, especially where technical tools need to communicate with the device.
MobiCode TEST helps businesses test used mobile phones more consistently. It supports structured device checks so teams can make better grading and resale decisions.
For trade teams, the goal is not simply to connect a phone to a computer. The goal is to record reliable results that support a commercial decision.
- Mobile phone testing: MobiCode TEST
- Device checking: MobiCode CHECK
How MobiCode supports Android device workflows
MobiCode helps businesses process used Android devices through connected testing, checking, unlocking and erasure workflows.
- MobiCode TEST: supports structured device testing before resale.
See: MobiCode TEST - MobiONE: helps connect checks, tests, wipe results and device records in one operational workflow.
See: MobiONE - MobiWIPE: supports clearer data-erasure processes before devices are released.
See: MobiWIPE - MobiCHECK: helps teams check IMEI and device status before buying or reselling used phones.
See: MobiCHECK - MobiUNLOCK: supports professional unlocking workflows where network restrictions need to be handled.
See: MobiUNLOCK
For recyclers, refurbishers and retailers, the value comes from consistency. Technical settings should support a controlled workflow, not replace one.

Common mistakes with developer settings
Most problems come from treating this Android feature as a normal everyday setting. It is not. It is a developer option and should be used with care.
Common mistakes include:
- leaving the setting on all the time
- approving an unknown computer
- confusing developer access with file transfer
- thinking the setting wipes the phone
- using debugging access outside a controlled business workflow
- forgetting to revoke old debugging authorisations
These mistakes are easy to avoid. Turn the setting on only when needed, use trusted equipment, and switch it off once the task is finished.
Commercial takeaway
USB debugging is an Android developer setting that allows a phone to communicate with tools such as Android Debug Bridge. It is useful for development, testing, diagnostics and some device-processing workflows.
For everyday users, the setting should usually remain off unless there is a clear reason to enable it. For businesses, it should sit inside a controlled workflow with proper device checks, testing, data erasure and record keeping.
Used correctly, this developer option can support technical work. Used carelessly, it can create unnecessary risk or confusion.
A practical example in a device-processing workflow
A refurbisher receives a batch of Android phones for testing and resale. Staff capture each IMEI, check device status, connect the phone to approved equipment, and use controlled tools to support diagnostics.
If a workflow requires USB debugging, trained staff enable it only for the required step. After testing, the team records the result, completes data erasure where appropriate, grades the device and routes it for resale or further review.
FAQ: Android developer settings
What is USB debugging?
USB debugging is an Android developer setting that allows a phone to communicate with development tools on a computer, usually through Android Debug Bridge.
What is USB debugging used for?
It is used for Android app development, device testing, diagnostics, log access and some technical workflows that need deeper communication between a phone and a computer.
Should USB debugging be on or off?
For most everyday users, USB debugging should stay off unless it is needed for a specific trusted task. It should usually be turned off again afterwards.
Is USB debugging dangerous?
It is not automatically dangerous, but it can create risk if a user enables it unnecessarily or authorises an unknown computer.
Where is USB debugging on Android?
It is usually inside Developer options. On many Android phones, Developer options are hidden until the user enables them by tapping Build number several times.
Is USB debugging the same as ADB?
No. USB debugging is the Android setting that allows communication with developer tools. ADB, or Android Debug Bridge, is one of the main tools that uses that connection.